How to Build a Composting Toilet
Executive Summary
- This article covers my view of the best way forward to build a composting toilet, as well as how these types of toilets work and considerations for setting one up in a van.
Introduction
One of the biggest hassles concerning van or RV living is the toilet. Most toilets in RVs go to a blackwater tank, which has disadvantages and is not a good solution for vans.
In my view, a military-style toilet using bags is the best for infrequent use — however, for frequent use — such as when dispersed camping in campgrounds without bathrooms, a composting toilet is the best solution for smaller vehicles without tanks or to dedicate much space to the toilet.
The Problem With Flush Toilets
This quote on how flush toilets work from the article Permaculture is an interesting observation about how inefficient flush toilets are.
Defecating in precious drinking water isn´t exactly a smart idea. Besides losing billions of gallons of water each year, pooping in water is akin to throwing money down the drain. Human urine and feces could provide needed nutrients for small farmers if correctly composted, thus helping farmers to lessen their dependence on unsustainable, oil-based fertilizers that cause damage to the soil food web.
Furthermore, flush toilets can cause hygienic problems as anyone who has had to deal with a stressed septic tank will know. Putting feces and urine into water or burying it under ten feet of dirt leads to anaerobic decomposition conditions. Anaerobic decomposition doesn´t only stink to high heaven, but it is also a breeding ground for a number of dangerous pathogens.
Composting toilets have been around for hundreds of years. As we mentioned above, the Chinese have been using human waste to maintain the fertility of their fields for thousands of years. Today, there are dozens of models for quality composting toilets that are safe and sanitary. The basic idea is to combine our waste which is of high nitrogen content with some sort of brown organic material that has high carbon content. The combination of high nitrogen and high carbon contadvent (ideally attempting to shoot for 80% carbon and 20% nitrogen) leads to aerobic decomposition that is healthy, safe and leads to quality humus. Dried leaves, sawdust, or chopped up hay bales make great brown material for a composting toilet system.
80% carbon, 20% nitrogen, means that the covering used should be high compared to the waste, primarily nitrogen.
When our high nitrogen waste is mixed with the high carbon content of brown organic material, thermophilic composting ensues. Thermophilic simply means that as microorganisms begin to break down the material, temperatures higher than 160 degrees Fahrenheit are achieved. This temperature ensures that all harmful pathogens will be killed off leaving a dark, fertile soil that can be used safely to fertilize fruit trees or flower beds.

What is Doing the Work in a Composting Toilet?
The bacteria are doing all the work when it comes to composting. All the compositing toilet is doing is setting up a good environment for the bacteria to do their job — aspiration (oxygen), a combination of the right materials, etc..
The bacteria that come from your digestive tract are not necessarily the best for composting.
So you can add bacteria that are specifically designed to break down excrement. They want a lot of oxygen, moisture, and a 20/80 combination between waste (nitrogen) and filler (carbon).
This is Permaculture’s advice on how simple a composting toilet is.
While there are now several different commercial composting toilet designs on the market today, you can also easily construct your own composting toilet to save on expenses and design a system that is best for your situation. The simplest composting toilet system is to simply go to the bathroom in a five-gallon bucket and cover your waste with a handful of brown organic material after each use. Once the bucket is filled up, you can take it to a compost bin where you again cover the material with an extra layer of brown material. This “humanure” system is used by thousands of people worldwide and offers an easy, simple, and efficient way to deal with your waste. After several months of decomposing in the compost pile, your “humanure” will be safe to use as a fertilizer for fruit trees or flower beds.
How Empty a Composting Toilet
This video shows a straightforward composting toilet. All you need is a bucket and the material that interacts with the waste and causes it to break down. This is done by adding the organic material over the waste after every new deposit. In terms of disposal, this demonstration has the man find some land, dig a hole, and then dump the contents and bury it when it gets filled. Because composting reduces the volume of waste through biological activity, this is not something that would need to be done that often.
What Composting Toilets Are Available for Purchase
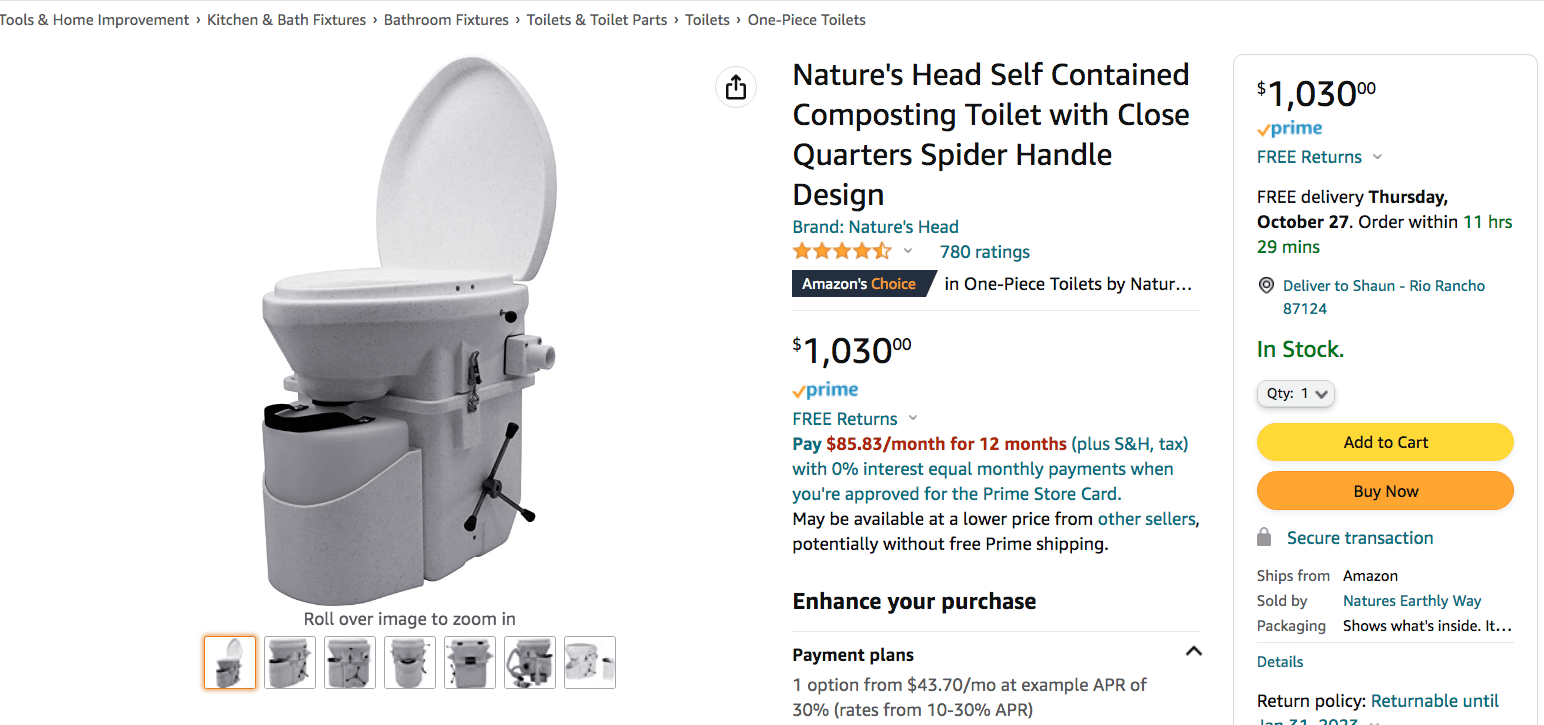
This is the top-rated composting toilet on Amazon. However, it does not offer that much money when one analyzes it. Secondly, this may not fit in with the van, as it takes up space that would be better used with a simple box.
Review of this Composting Toilet
A review of this composting toilet gives good insight into what to improve if one builds a composting toilet.
I have been using this toilet for over 4 months full time in a RV and it’s time for the review. I would give this toilet more stars if it were priced at about $300-400 which is what I feel it’s worth. This toilet has way to many flaws to be at its current price.
Pros:
This toilet uses no water so if you are dry camping in a RV you can extend your stay several days without having to fill your fresh water tank or find a sewage dump site.
The steel and the plastic used is functional (except for the urine reservoir, see cons).
Cons:
It’s ugly.
The vent hose included is is only 5ft which is too short to vent the toilet to the roof of most RV’s or a standard home. You can buy a longer one by the foot but it’s not cheap. In fact all their accessories are over priced. The hose can easily be cut so the manufacturer should really not be so cheap and include at least 8ft of vent hose.
There is no need for a complex venting hose. A simple opening can be cut in the back of a box facing the side doors. This is an opening with a sliding door allowing for a large opening. But when the van is closed, it is not venting continuously.
For example, I often am in my van and open the side door. This is the right time to vent the air in the composite toilet. I usually have the door open for hours, which should allow plenty of time to vent the air.
It is also a concern that all the accessories are expensive, as the process offered in this composting toilet can be replicated.
The vent fan included has so little power that if another larger fan such as the bathroom ceiling fan is in use it will actually suck air from the toilet’s exhaust hose back into the RV bringing odors into the bathroom. Opening another roof vent or window in the RV before turning on the ceiling fan will help prevent this from happening.
That is an easy issue to resolve. A computer fan could be built into a custom composting toilet box, which is much more significant. I already have experience with these fans, as I have added two of them to my laptop. Two fans with audio output run off a USB are around $15.
A big part of how well the composting occurs is how much air is available, which means good fans. The fans are not only used to move the smell of the air outside the van but are critical to the decomposition process.
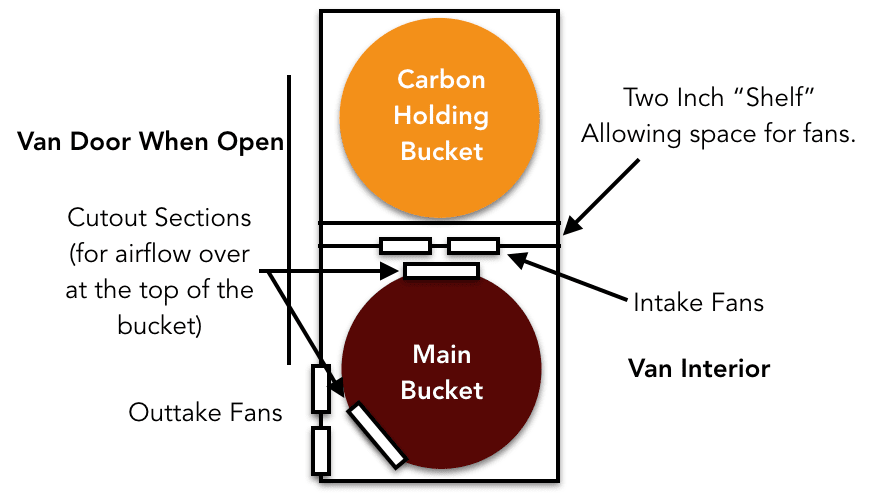
The Design of the Air Movement in a Custom Composite Toilet
- I could imagine two computer fans that pull air into the box (at the midpoint of the box, requiring a two-inch shelf to be cut into the box to both position the fans and provide air space so the fans could pull in air). These two fans would blow over a large hole of several inches cut out of the top of the bucket, then an opening cut into the other side to allow airflow to move through the top. This would reduce the capacity of the bucket by around two inches.
- The back of the box, facing the door, would have to have more fans that pull the air out of the box (towards the front of the side facing outward, which faces the side van doors (when open).
This diagram shows the custom composting toilet from the top view.
Stirring the Contents?
Most commercial composting toilets have a way of turning the mixture. You can see this on the first toilet as well. This stirring is covered in the following video.
The only problem is what to do with the dirty end of the stick when the stirring is finished. One could spray it down with alcohol and wipe it with a paper towel. Much of the material that came back up with the stick would be the material added to the mixture from the carbon bucket.
The quote from the review continues.
No external vent or back-draft stop is included. For the over priced toilet I feel like a marine vent, a house vent and a RV vent should all be included. I ended up using 1 1/4 inch PVC pipe with a 90 degree elbow and a screen cut and glued to one end of the elbow. The vent hole is cut on the floor near my water heater where it is out of sight. The elbow will need to be able to turn to face away from wind gusts. If you live a windy area the wind will push smells back through the exhaust hose back into the bathroom.
The toilet does not smell like sewage. It does however smell funky. I wouldn’t call it a soil smell, maybe earthy. It smells more like a combination of a rotting tree log and a swamp. It doesn’t make me gag when I empty it so it’s not a bad smell but it isn’t odorless and doesn’t smell like soil.
Larger fans and better ventilation should take care of a lot of that. It sounds like this toilet is “under aspirated.”
To empty the urine you must lift the seat releasing the funky smell into your bathroom. It’s a terrible design.
A custom composting toilet would not have any urine bottles.
The seal between the seat and the composting bin is not a suitable material for its use. After only a few months mine has stretched and it has started to slip out of its position so it no longer makes a perfect seal.
That is a significant problem. But the article DIY Composting Toilet shows this issue being taken care of by just making the box fit right over the bucket.
However, if that is done, and there is no space, then the idea of using fans does not work.
But this topic brings up the question of the top. It makes sense to have a “lid” on the box on a single that flips up when it is to be used. The toilet seat could only be placed on the box when needed. That way, the box is flat on top, allowing it to be placed on it.
For me a 210 lbs. male using this full time the solids will need to be emptied every 3 weeks. If I squirt the toilet paper with a water bottle before turning the spider handle I can sometimes get 4 weeks of use before I have to empty the solids.
That is good.
One is probably limited by the contents that could be held in a Home Depot/Lowes bucket. While driving, the bucket would be held up and in place because the top goes through the hole cut in the top. I have several buckets in my van presently, and they only rarely tip over. If they were connected at the top to a structure — if that connection was very positive — I don’t think they would move. This evaluation is critical, as having a composting toilet bucket tip over in a van would be a bad experience and a major mess.
Peat moss, in my experience, is not a good choice for this toilet. It is heavy, bulky, and, worst of all, it will hatch fungus gnats. Coco coir is the best since it is lighter when dry and contains no bug eggs. Coco can be found in large dry compressed blocks at your local grow/hydroponic stores or on Amazon. It usually isn’t available at the bigger department stores.
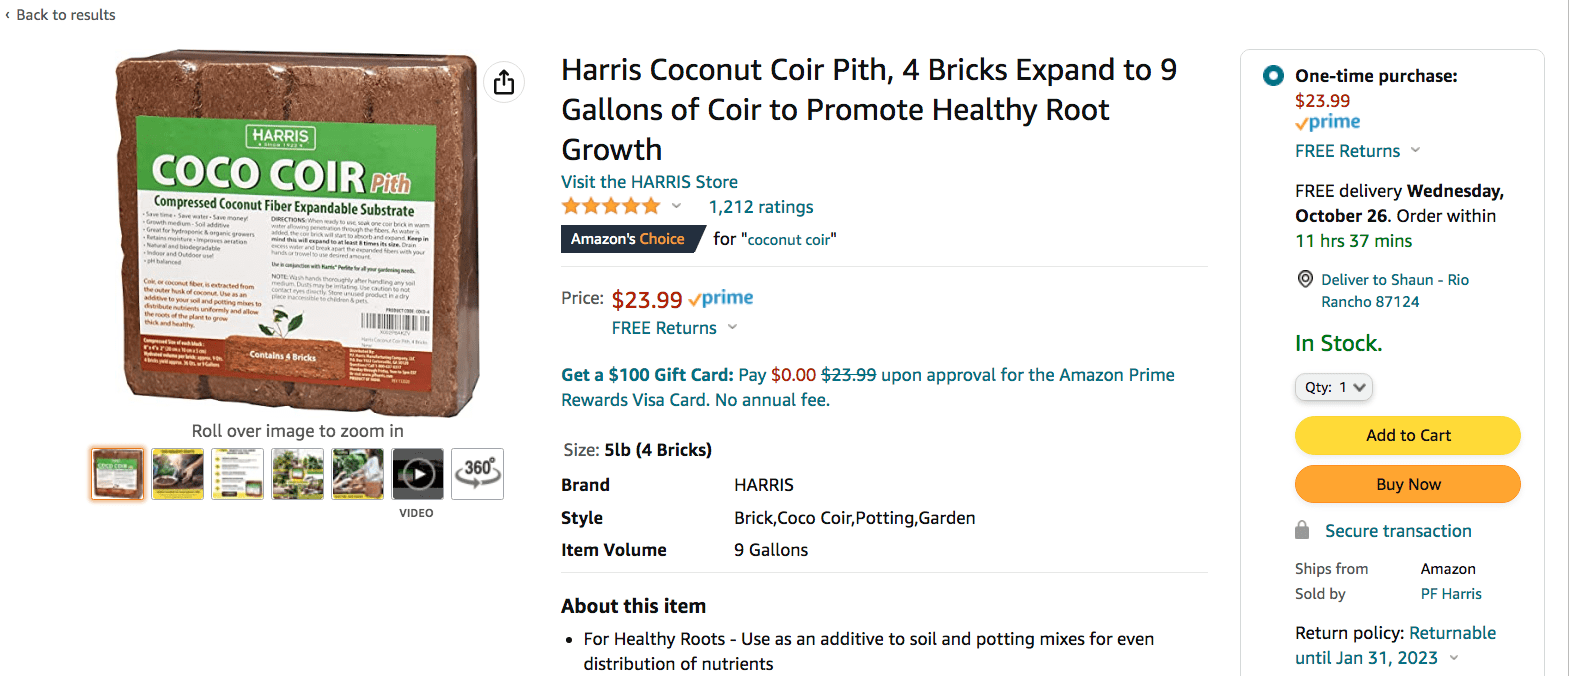
This is easy to find on Amazon, and I found these reviews that describe how to use Coco Coir.
I mix coir with perlite and Fox Farms potting soil and, with that use, this package of coir is a very good deal in my opinion. I break an individual brick into pieces and, while agitating it, gradually add water until it has reached the consistency I desire. If I have some left over, I put it in a plastic garbage bag and twist-tie it so that it retains moisture and is ready for another use.
You mix this material, which ships in a dedicated hard form, into the water until it is a fluffy consistency.
This means you keep this material in a second bucket and then have the material handy to use after you use the composting toilet.
It makes sense to have this second “carbon” bucket housed in the same box as the main bucket or “nitrogen bucket” and with a similar flip-top lid.
How the Coco Coir from condensed blocks to a useful material for the composting toilet is explained in the following review also from Amazon.
I had purchased this thinking I could use just a bit now, and more later – nope, not so much. It is VERY condensed – even a knife wouldn’t cut it in the “fresh out of the package” form. Once you add water and let it sit, it turns into wonderfully fluffy material that works great for seed starting. Every one of my seeds sprouted and did well! I certainly recommend, but be aware that you need to use it all, or find a way to store it in its ‘fluffy’ state!
Although another option appears to be sawdust, which is explained in this article DIY Composting Toilet.
I guess one could try one or the other or both, and see which was the more effective.
Conclusion
Building a composting toilet seems like something that can be done with reasonable effort. It requires building a box out of plywood with holes at the top for access and holes on the sides for fans and airflow.
By doing it custom, one can certainly increase the airflow over what I have seen reviewing the commercial options.
The main questions are
- a) am I willing to make room in the van to have a composting toilet? And..
- b) am I willing to put in the effort to build and maintain a toilet like this?
I think the answer to these questions is yes to both. The reasons are…
- Without having a “frequent use toilet,” I am more limited in where I can stay, and I have a greater tendency to stay around places I know that I can use a toilet.
- In the case of dispersed camping — places with bathrooms will tend to have a charge. And this means more people. When you perform dispersed camping in places with no bathroom facilities, because normally only RVs have toilets, the number of people declines.
- The fact that the toilet would be a simple box means that while it would take up space, it could be used as a type of seat in the van, and with a flat surface, it could have boxes or other items placed on it. Therefore the structure would not as obtrusive to the van interior as a commercially purchased composting toilet.